
By now you should have set up your Facebook business manager, and your first ad account. If you're going to be using an ad account to drive traffic to a website, then you'll want to take the time to install a Facebook pixel.
What is a pixel?#
A pixel is a small piece of code which sends information back from your site to the Facebook servers.
Its name comes from the days when you would actually load a pixel on your site; a tiny pixel-sized transparent image. Facebook would be able to tell when the pixel had been loaded by a user, and would use this to pass information back to its ads platform.
Nowadays the pixel is a piece of code that looks like this:
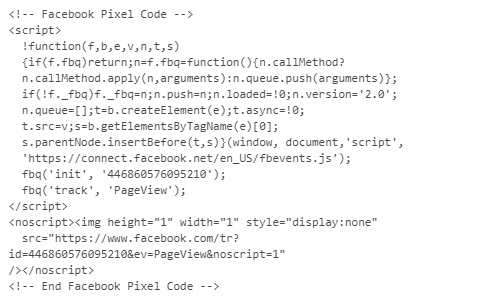
Pretty ugly right?
Fortunately, we only need to look at two lines to really understand what's going on here. Firstly the line:
fbq('init', '446860576095210');
This is where Facebook initialises the pixel. It does this by calling a function called 'fbq' which basically allows the pixel to talk to the main Facebook servers.
Of course it's not enough just to talk to a server; you need to say something. In the line above, the pixel is saying init (short for initialise this pixel) and it's passing the pixel ID which it wants to initialise (in our example this is 446860576095210).
With this line, the pixel is up and ready to go. There's one other thing we need to do in order to track activity though:
fbq('track', 'PageView');
This line tells the (already initialised) pixel that we want to track something, and that this something which we want to track is a 'PageView' event. A PageView event is what you want to track every time someone loads a page, and is crucial for determining what pages of your site people visit after clicking on your ads.
How do you create a pixel?#
Creating a pixel is incredibly simple. Simply follow this link, log in to your business manager, and you should be taken to the pixels page within business settings. At the top of the page, click 'Add' to create your pixel.
Once your pixel has been created, follow the options to set up your pixel. If you're working with a developer, you can use the option to email them instructions for the pixel. If you'll be installing the pixel yourself you have two options:
- You can install the pixel through a 3rd party platform (Google Tag Manager, Shopify etc.) if you're using one. Instructions on how to install this way will vary by what platform you're using. My recommendation here is to Google {platform name} install facebook pixel to find the instructions most relevant to you.
- If you have direct access to your site's code, you can install the pixel manually. Simply click the option to install manually, and you'll see the code you need to install. This code will need to fire every time the page loads (remember how we want to track every page view), so it's advisable to put it in your site's tags.
If you've followed one of the two routes above, your pixel should be correctly installed and passing data back to Facebook.
Tracking conversions using a pixel#
So far we've figured out how to track page views using a pixel. As useful as it is to see where people have gone on your site, it's much more important to see what they've done. For this we need conversion tracking.
There are two ways that you can track conversions using a Facebook pixel, and these depend on whether the conversions you want to track have unique URLs.
If your conversions have unique URLs#
To give an example of what I mean by this let's say:
- You're running an eCommerce store.
- You want to track purchases.
- All purchasers are redirected to a thank you page on your site (e.g. mysite.com/thank-you).
In this case, you have a unique URL corresponding to a purchase (mysite.com/thank-you). Whenever someone makes a purchase they visit this page, meaning that someone visiting this page is effectively the same as them making a purchase.
The reasons this is significant is because it lets us track purchases by tracking views of the thank you page. Because we've set up our pixel to track all page views on the site, we've already done most of the work towards tracking purchases.
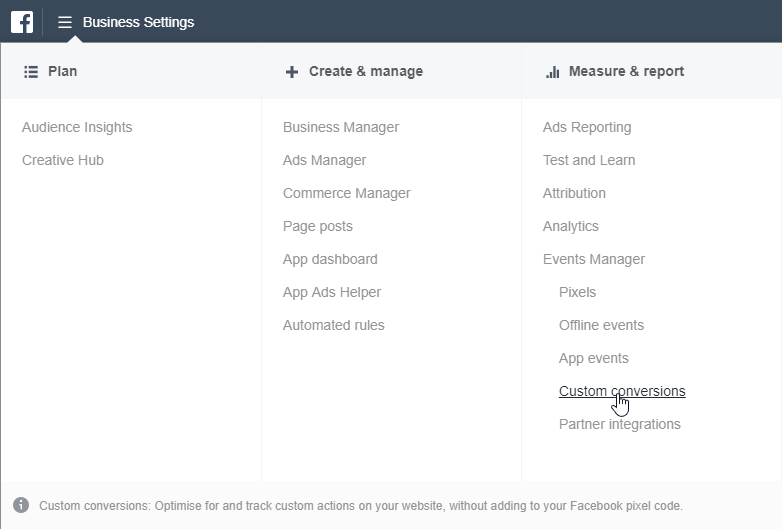
The last step here is to create what's called a custom conversion, corresponding to visits of the thank you page. We can do this by opening the business manager navigation menu in the top left of the screen, and clicking on 'Custom Conversions'.
Once inside, you'll want to click 'Create Custom Conversion'.
A dialog box will open, and near the top of this you should see a tab which says 'Default Offline Event Set For {your business manager name}'. Click on this, and change it to the pixel you created earlier.
Now you can define the URL rule that you want to count as a conversion. For our example earlier, our rule might look something like this:
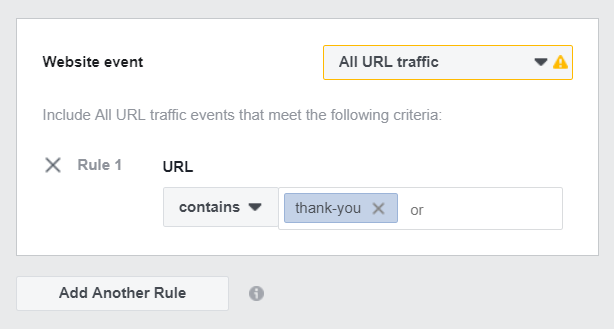
Have a think about whether your rule will track exactly what you want it to. If you're looking to track a thank you page like in the example above, and are sure that this rule won't pick up any other URLs, then you're good to go.
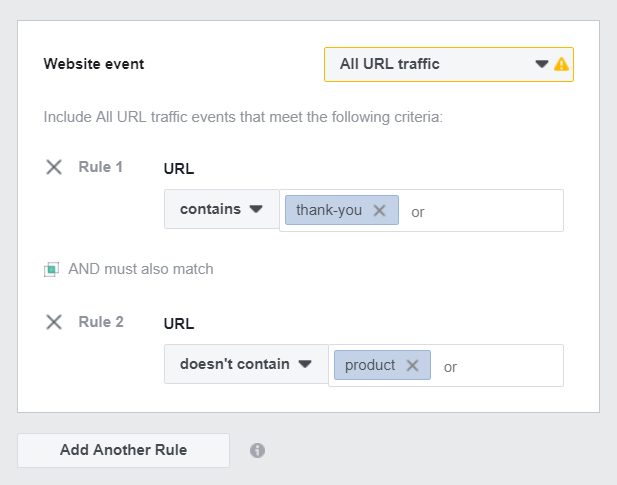
One example where you might run into trouble is if you have other URLs on your site which contain 'thank-you', for example if you sold thank you cards. In this case you may need to click 'Add Another Rule' in order to filter out unwanted URLs. If all of your thank you card URLs look like mysite.com/product/thank-you-card then you can add another rule to filter these URLs out:
Once you've set up your rules appropriately, scroll down to add:
- A name for your conversion.
- A category for it. This can be used to simplify reporting later on, so pick whichever option most closely matches what it its you've decided to track.
- A value for your conversion. This is optional, and should only be used if you're interested in reporting on value. Note that this value isn't dynamic (it can't depend on the product that someone's bought, for example); we'll cover how to track dynamic values shortly.
That covers how to set up a conversion when you have unique URLs corresponding to your conversion events. If you don't have URLs corresponding to these events, or if you want to pass dynamic values into your reporting, you'll need to use event-based tracking.
Tracking conversions via events#
Event tracking is useful in situations where you not every conversion you want to track has a URL that corresponds uniquely to that conversion. An example might be if you're trying to track people signing up to your newsletter via a form. Many forms won't redirect the user to another URL upon submission, and so you'll need a way of tracking when a user has submitted their details without relying just on URLs.
The idea of using event tracking can be intimidating at first, but in reality it's quite simple. We've already looked at a type of event tracking so far, tracking PageView events. Tracking conversions is no more difficult than this.
To start, you'll have to choose which of the following events most closely resembles what it is that you want to track:
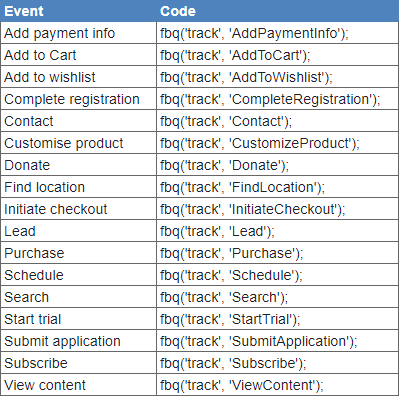
Once you've chosen the relevant event, take a note of the code that appears to its right. You'll notice that this code looks just like the code we saw earlier for tracking page views:
fbq('track', 'PageView');
Once you have this code, you'll need to make sure that it is loaded whenever someone completes the action that you want to track. How exactly you do this will depend on how your site is built, and what it is you want to track. One common example of how you might implement this is by using something called an event listener.
Event Listeners#
Let's say you want to track when someone clicks a button, perhaps because this is the button people press to submit their details and sign up for your newsletter. The way you'd do this is to create an event listener, which listens for people clicking your button, and loads the Facebook event code whenever someone does click the button.
An event listener is a piece of JavaScript code which can sit anywhere on your page, and looks like the following:
<script type="text/javascript">
var button = document.getElementById('newsletter-button');
button.addEventListener(
  'click',
  function() {
    fbq('track', 'Subscribe');
  },
  false
);
</script>
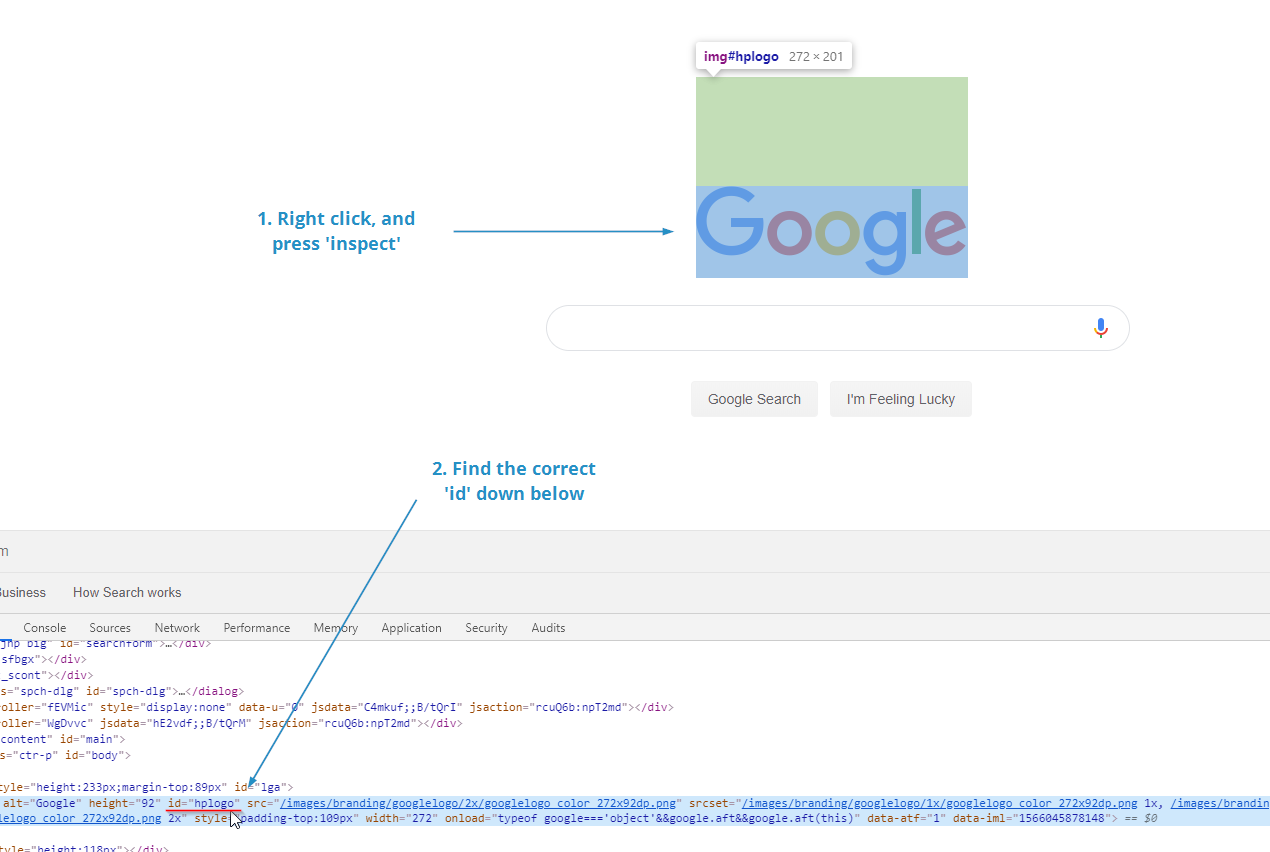
Here the code listens for clicks on an element with the id newsletter-button. This should be changed to the id of whatever it is you're looking to track. If you're unsure of how to find an id, you can often right click on it, select 'inspect', and find the nearest id in the developer tools window. For example, to find the id of the Google homepage logo:
You'll also notice that in the event listener example above, I've chosen to track subscriptions using the 'Subscribe' event. You're completely free to change this to any other event featured in the table shared earlier in this article.
Once you have your event tracking set up, Facebook will be able to tell you whenever anyone completes the events that you've decided to track, and whether they've done so after seeing your ads.
Value tracking#
The last piece of the puzzle now; how do we track value?
This is particularly useful if you're running a site where you can assign monetary values to specific actions, like purchases. We can pass these to the Facebook pixel using JavaScript objects like the following:
{value: '9.99', currency: 'USD'}
Here we've specified that a certain action is worth $9.99 to us.
In order to pass values along with an event, we simply modify our tracking code to include the object as a third parameter. For example:
fbq('track', 'PageView', {value: '9.99', currency: 'USD'});
Now, whenever this event fires on your site, you'll be able to see the associated value with it in your Facebook reporting. This is great for ensuring that the total value generated by your ads exceeds the amount you spend on ads, i.e. for ensuring your ads are profitable.
Oftentimes it won't be possible to give a fixed value for each event you want to track. This would be the case if you were running an eCommerce store with multiple different items, each of which needs its own value.
In this case, you'd have to pass the value of the item (or basket) in via a JavaScript variable. Details of how to do this will vary depending on how your website is set up, so it's worth checking with whoever hosts your site. An example of how this might look is:
fbq('track', 'PageView', {value: cart.value, currency: 'USD'});
To wrap up#
We've seen how to create a pixel, and how to set it up on a site. For tracking conversions we've explored two options, URL based conversions and event based conversions. We've also looked at how to pass dynamic values to your conversions, so you can track things like revenue generated by your ads.